This script allows you to create cool HTML-based galleries with navigation. You can use these galleries for publishing your images on CD-ROM or upload them to your web page.
The Photo Gallery Creator is very powerful and shows what can be done using the scripting capabilities built into IMatch. The script is very flexible and allows you to create virtually any output you want, just by customizing the HTML templates and the profiles.
Don't treat this script as a full solution for web publishing. This script has been created to show what can be done using scripting, and how flexible IMatch and the scripting language is. If you want to do something special, you can customize the script to fit your needs.
Start the script from the Scripting Manager menu: Scripting|Scripts| Publish Your Images to the Web|(jf) Extended Photo Gallery Creator.
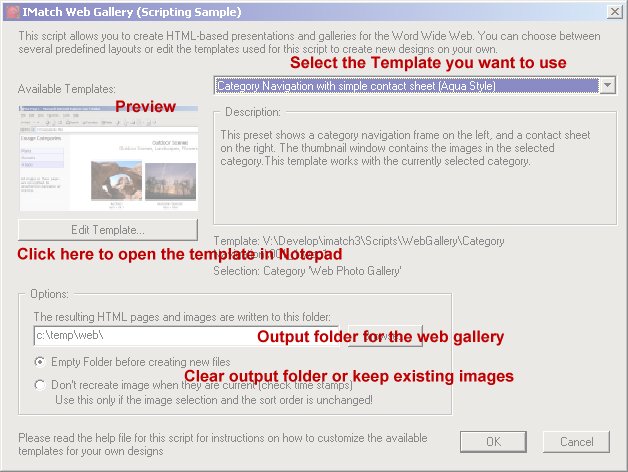
After a short initialization phase, the script displays the following dialog box. This dialog allows you to control the output folder for your web content, the template to use and how the script treats existing contents in the output folder.
The Available Templates shows all templates (or Presets) in the scripts\WebGallery folder of your IMatch installation or any of its sub-folders. The dialog shows a preview of the selected template with sample images.
The Options section in the dialog allows you to control where the output of the script (the HTML pages and images) is created and how the script treats existing content in that folder.
You should first create a new folder on your disk for your web content. Then use the Browse button to navigate to that folder. The script will save this folder as the default folder automatically.
The Empty Folder before creating new files is the default option. IMatch will delete all existing content in the output folder before the script creates new content. All files including read-only files and one level of subfolders and their contents will be deleted. If there are any hidden files, they will not be deleted. Use this option if you run different templates, so the folder will not contain unwanted images or HTML documents from previous runs.
Warning: If this option is set, all files and one level of subfolders in the output folder will be deleted. Make sure that the folder does not contain important data.
If you run the same template all the time, or if you have made modifications
on your template and you want to re-run the template, you can use the second
option. If this is set, IMatch will not delete images in that folder. Especially
when you have to process a large number of images, this is a great time saver,
because the script does not need to generate the thumbnail images again.
Note: If you change the selection between the runs, the script will
automatically create missing images. If you change the size of the images in an
image list in your template, don't use this option or your images will have the
wrong size.
These three options in the dialogue box will be saved automatically as the defaults for the next time the script is run.
Most presets work with the images in the active selection. Select a folder, images in a thumbnail window or a category before you run this script. Some generators offer multiple ways of selecting images.
After the script has created the photo web, the output folder contains a
mixture of HTML pages, images, style sheets and other files required to run the
web.
Use your favorite FTP utility or other publishing tool to upload all the files
in that folder to your web site.
The name of the web's main page (a.k.a. start page) can be specified in the preset file like this: MainPage=index.html. The default name is index.htm. If you want to link to the start page of the gallery, use this page. If your web site already contains an index.htm document you can either rename the output file in the template, or create a sub-folder on your web server for the photo gallery.
You can also burn the contents of the output folder to a CD-ROM and ship this CD to your customers and friends. All they need to view your photo gallery is a normal web browser (4.x versions). No special applications are required or need to be installed.
This section explains how the Photo Gallery script works, and how you can create your own presets and templates.
|
Note: This section assumes a fair
knowledge of HTML, JavaScript and IMatch scripting. |
The Photo Gallery script supports two levels of customization: HTML templates
/ contents and presets.

HTML templates allow you to control how the resulting documents will look, and how the active content is placed on these documents. You can use any number of HTML templates to create your photo gallery. In addition to HTML templates, you can use any number of graphics, backgrounds, style sheets, music and video files, flash files and whatever to create the design you want.
The preset is a simple text document with special keywords. It controls how the Web Gallery script works, and how it uses the HTML templates, contents and your current database to create the photo gallery.
A preset is a normal text file with the extension .wpg1. The script will automatically detect the presets in the Web Gallery folder and display them in the dialog box. A preset contains keywords, processing instructions, and key/value pairs which control the generation process.
Each line in the preset must be one of:
All consecutive continuation lines are simply concatenated before the keyword and value are examined. Trailing spaces in a line are insignificant.
The previous example is equivalent to this:
Keywords define the input for the script and the generator modules used to emit the HTML pages.
Note: The syntax of presets has not been defined to be very user-friendly. Since we work with scripting here, adding too much comfort to the preset syntax would result in a much more complex script. Please follow the script syntax given here closely, and use the sample scripts provided for hands-on examples.
Each keyword line consists of the keyword itself, followed by an equal sign and the value of the keyword:
Keyword=<Value>
Don't add blanks before or after the equal sign. If you want to add a carriage return / linefeed, use the \n escape symbol:
Description=This is line one.\nThis is line two
This is a special case for the description keyword, because the
description is displayed in the script dialog.
To add line breaks to the resulting HTML code, use the normal <br> tag:
MyText=This is line one.<br>This is the second line.
In the preset file "\n" and "\t" are special notations for the carriage return character and the tab character, correspondingly. Do not use the backslash character (\) as path separator for file names. Use the forward slash character (/) instead to avoid inadvertent replacements of the two special characters.
| Name | The name of the preset as it is displayed in the dialog box. Choose a descriptive and short name |
| Description | The description of the preset. This text is shown in the dialog when you select a preset. You can enter about 200 characters here (the text must fit into the available space in the dialog box) |
| Preview | The preview image. The file must be in BMP format and in the same folder as the preset. If you keep the image in a different folder, use an relative or absolute path |
| MainPage | The name of the main page of the generated web. If this keyword is missing in the preset then the main page is index.htm. |
| ImageList | Defines the image lists to be used. You can have any number of image list statements in your profile. See below for more information. |
| ImageQuality | Controls the quality of the generated images. You can use values
between 2 and 255 for this parameter. The higher the number, the
higher the compression will be. A value between 30 and 60 gives good
compression with minimal quality loss. You should try several values with
your images to find the compression factor that works best for you. The
default value for ImageQuality is 30. This
setting applies to all image lists, unless an image list defines the
quality
argument. Example: ImageQuality=35 |
| ImageFormat | Specifies the format of the generated image
files. The default format is
JPEG24_STANDARD. Other supported values
are (capitalization irrelevant):
JPEG_LOSSLESS,
JPEG_PROGRESSIVE.
This setting applies to all image lists, unless an image list defines the
format
argument. The following values are still supported for backward compatibility with existing presets, although IMatch does no longer support these image formats starting with version 3.5.0.16. You should change any preset that still uses one of the obsolete values. The script will map the obsolete value into one of the three values listed above. JPEG8_YUV400, JPEG8_YUV400_LOSSLESS, JPEG8_YUV400_PROGRESSIVE, JPEG24_YUV411, JPEG24_YUV411_PROGRESSIVE, JPEG24_YUV422, JPEG24_YUV422_PROGRESSIVE, JPEG24_YUV444, JPEG24_YUV444_PROGRESSIVE, JPEG24_LOSSLESS. Example: ImageFormat=JPEG_PROGRESSIVE |
| ImagePreResize | Defines the image processing steps to be
applied to each image before it is resized.
See below for details. This setting applies to all image lists, unless
an image list defines the
preResize
argument. Example: ImagePreResize=Unsharp,2,3,2 & HistogramEqualize |
| ImagePostResize | Defines the image processing steps to be
applied to each image after it is resized.
See below for details. This setting applies to all image lists, unless
an image list defines the
postResize
argument. Example: ImagePostResize=RemoveNoise,10 |
| ApplyTransforms | This parameter controls whether the script applies thumbnail transformations (rotation, mirror, flip) to the images in your gallery. If this parameter is not set, IMatch will not apply transformations. All images will show up in your gallery as in the original image. If you have rotated images in your database (thumbnail transformations) and you want the images to appear as in the thumbnails, turn this parameter on. |
| SortPreset | The sort preset to use for image sorting. You can use any sort preset
defined for the active
database here.
If you want to use a Light Table sort, you need to do two things: a) Use SortPreset=LightTable or SortPreset=Light Table and b) Make sure you have selected a folder, a category, or some images in the selection view before you run the script. Since Light table sorts are associated with a folder/category level, IMatch needs to be able to determine which folder or category should be used to perform the light table sort. |
| SortCategories | This parameter controls the sorting of sibling categories. Sibling categories are categories that are on the same level in the category hierarchy. Turn this parameter on to sort sibling categories alphabetically by name. This is the default sort order if the keyword is missing. If the parameter is turned off, then sibling categories appear in the same sequence as in the category view. The sequence of categories in the category view can be changed by the user. If the parameter is turned off without defining a display sequence in the category view, the resulting sort order of sibling categories is alphabetically by name. |
| CalculateCategories | This keyword controls whether the CatNavPage
and CatTree
generators calculate categories. If this parameter is not turned
on, the generator will only use the direct images of categories.
Direct images are images directly assigned to a category. The images in
sub-categories are not considered. Turn this parameter on to calculate categories when the generator runs, and hence include the images of sub-categories in their parent category as well as images determined by category formulas. This is the behavior you see in the normal category view within IMatch. If the keyword is missing, then it is considered to be on. If the value is "formula" then the generator processes only direct images except for categories that have a formula. For those categories the keyword is considered to be on. Capitalization of the value is insignificant. |
| IncludeEmptyCategoryBranches | This keyword controls whether the CatNavPage and CatTree generators include categories without any direct or indirect images. The default is to skip category branches without images. To include empty category branches, turn this parameter on. |
| ExcludeCategories | In image selection mode of the CatNavPage and CatTree generators the value of this keyword is a list of names of categories that together with their subcategories are omitted from the navigation. |
| IncludeCategories | An alternative to ExcludeCategories. In image selection mode of the CatNavPage and CatTree generators the value of this keyword is a list of names of categories that together with their subcategories are explicitly included in the navigation, and all others are excluded. It is possible to include a category and exclude some of its subcategories, but if you use both IncludeCategories and ExcludeCategories, you will need to be careful to ensure that they combine meaningfully. |
| OrphanCategory | In image selection mode of the CatNavPage and CatTree generators the value of this keyword is a category that is used for orphaned images. Orphaned images are images without any assigned category other than excluded categories or their subcategories. |
| @All.FullName | Its value is used for the special variables <#CurCatFullName#> and <#ParentCatFullName#> when the current (parent) category is @All. The default value is "All". |
| @All.Name | Its value is used for the special variables <#CurCatName#> and <#ParentCatName#> when the current (or parent) category is @All. The default value is "All". |
| @All.Description | Its value is used for the special variables <#CurCatDesc(@)#> and <#ParentCatDesc(@)#> when the current (or parent) category is @All. The default value is the text displayed by IMatch when the category @All is selected. |
| CopyFiles | This keyword allows you to list files that should be copied from the preset folder to the output folder. These files are just copied, no processing takes place. Use this keyword to copy images, sounds, frame pages, movies and the like to the output folder. |
| ProcessFile | Identifies a HTML template that needs to be processed to create the photo gallery. You can add any number of ProcessFile statements to your preset. |
| Key/Value Pairs | Key/Value pairs are one of the most important features. They allow you to control the generation process and the look and design of your web pages. |
| PanoramaRatio | For very wide, panoramic images the gallery images will be the same width as a normal landscape image, but not very high. You can instead choose to set the height of such images to be the <Size in pixels> in the image list, and the width will be set so as to preserve the aspect ratio. The panorama ratio specifies the minimum width-to-height ratio of an image to be treated as a panorama image. If this value is set, images with a larger aspect ratio will receive panorama resizing, and images with a smaller aspect ratio will receive normal resizing. A value of 2.5 is suggested. A zero value turns panorama sizing off, which is the default. This setting applies to all image lists, unless an image list defines the panoramaratio argument. |
| PanoramaScale | Using the PanoramaRatio variable can result in very large gallery panoramas. It can look a little unnatural for a panorama to be as high as other images as well as being very wide. The scale appears to be wrong. To solve this you can also set the PanoramaScale variable, so that both the height and width are scaled down by this percentage. A value of 70 (percent) is suggested. A zero value turns panorama sizing off. The default scaling value is 100 (percent). This setting applies to all image lists, unless an image list defines the panoramascale argument. |
| UseFullImage | Most raw image files contain a lower-resolution preview image. This embedded preview image typically loads faster than the raw image. By default, the gallery script uses the embedded preview instead of the raw image, unless the desired gallery image dimensions are larger than the preview image, e.g., when the size is set to "*". To always use the full resolution image turn this parameter on. This setting applies to all image lists, unless an image list defines the useFullImage argument. |
Use one of "1", "y", "yes", "true", "on" as value to turn on a Boolean keyword setting, such as ApplyTransforms. The capitalization of the value strings does not matter. Any other value turns the parameter off.
With an image list statement you can instruct the script to create a set of transformed images from your original image selection. These images are written to the output folder. A preset can have any number of ImageList statements.
The images generated by an image list statement are always in JPEG format.
To specify an image list, use the following syntax. White space characters and capitalization do not matter (except for <Name>.)
ImageList=<Name>:<Size>[:copyIPTC][:quality=<compression level>]
[:format=<image format>][:preResize=<instructions>][:postResize=<instructions>]
[:panoramaratio=<ratio>][:panoramascale=<scale>][:useRawImage]
{[:top|:middle|:bottom][:left|:center|:right][:font=[<font face name>][,<font size>]][:text=<some text>]}
Caution: The IMBitmap.DrawText method does not support all sizes of each font.
Text can be added to the same image in up to nine locations. These locations are specified using the possible combinations of the keywords for vertical and horizontal alignment. The vertical alignment applies to any succeeding text= argument until the next top, middle, bottom keyword is encountered. The horizontal alignment applies to any succeeding text= argument until the next left, center, right keyword is encountered.
For each of the nine text locations, the first text element containing at least one character other than white space characters determines the text that is added to the image. Any later encountered text= argument for the same location is ignored. This allows specifying fallback text in case not all processed images have a desired property.
It is possible to use the special variables <#CurFileSize...#>, <#CurFileWidth...#>, <#CurFileHeight...#> inside of <some text>. Those variables reference an image list. It is required that the referenced image list is defined in the preset file before it is referenced. Otherwise an error will abort the script. It is not possible to have circular references. For example, it is not possible to reference the same image list inside its own declaration.
ImageList=thumbs:120
This statement creates an image list from your current selection. Each image is 120 pixels maximum.
ImageList=thumbs:100
ImageList=preview:320
These statements create two image lists from your current selection: One image list with thumbnails, and one image list with larger preview images. Some of the sample scripts use two image lists for contact sheets and larger preview images.
ImageList=thumbnails/thumbs:120:CopyIPTC
This statement creates an image list named thumbnails/thumbs from your current selection. Each image is written to the subfolder thumbnails and IPTC information is copied if present in the original image.
ImageList=content:*:font=trebuchet ms:text={Image.IPTC.Copyright Notice}:text=<#Copyright#>
This statement creates an image list from your current selection. Each image is the same size as the original. The IPTC copyright notice is added right-aligned at the bottom of each image using the given font face and the default font size. If the IPTC copyright notice is empty, then as a fallback the text in the value of the KVP <#Copyright#> is added. Note the use of the IMatch variable {Image.IPTC.Copyright Notice} and the KVP <#Copyright#>.
ImageList=content:!:font=trebuchet ms:text={Image.IPTC.Copyright Notice}:text=<#Copyright#>
This is similar to the previous example, except that all JPEG images are just copied to the output folder. For copied images, the image list processing instructions are ignored. If an image is offline or if it has an extension other than "jpg" or "jpeg", then the image is processed just like in the previous example.
ImageList=content:*:font=trebuchet
ms:bottom:center:text={Image.IPTC.Copyright Notice}:text=<#Copyright#>
ImageList=thumbs:100:top:left:font=Courier New:text=<#CurFileSize&content&0.0_KB#>:
right:text={Image.ShortDate}:font=Arial,18:bottom:center:text={Image.Format}
Note: this is one line in the
preset file
This statement creates two sets of images from your current selection. The first list keeps the size of generated images the same as the original. A copyright notice is written centered at the bottom edge of each image.
The second ImageList produces images with 100 pixel dimension. In the top left corner of each image the output file size in kilobytes of the corresponding content image is written using the font face "Courier New". The short form of the image's modification date is written right-aligned at the top. Finally, a description of the image's file format is written centered using font face "Arial" at the bottom of the image in 18 points size.
You can specify certain operations to be applied to each image before it is written to the output file. A separate list of operations can be specified to be applied before (PreResize) and after (PostResize) the image is resized according to the size argument of the image list. The PreResize operations are always applied. The PostResize operations are only applied if the image was actually resized.
Example: ImagePostResize=Sharpen,-500 & Gamma,1.5 & HistogramStretch
In this example three operations are applied to each image after it is resized: sharpening with argument -500, followed by gamma correction with argument 1.5, followed by increasing of contrast using the IMBitmap.HistogramStretch method. The different operations in the list are separated by an &-character. The operation's name and its arguments (if any) are separated by a comma.
The following operations are supported. For details about the semantics of each operation refer to the IMatch help file, especially the description of the methods of IMBitmap.
| Operation | Description | Example |
| Unsharp, <amount>, <radius>, <threshold> | Performs an unsharp masking effect on the image. This effect allows you to make the image sharper or crisper. | Unsharp, 2, 5, 3 |
| Sharpen, <amount> | Sharpens the image | Sharpen, 300 |
| Intensity, <amount> | Changes the intensity (brightness) of the image. | Intensity, 200 |
| Gamma, <amount> | Modifies the gamma value of the image. | Gamma, 1.5 |
| Contrast, <amount>, <useHistogram> | Modifies the contrast of the image. | Contrast, 100, yes |
| HistogramEqualize | Bring out the details in dark areas of the image. | HistogramEqualize |
| HistogramStretch | Increases the contrast of the image by manipulating the range of intensity values. | HistogramStretch |
| Hue, <angle> | Changes the hue of colors of the image by rotating the color wheel. | Hue, 20 |
| Saturation, <amount> | Increases or decreases the saturation of colors of the image. | Saturation, -30 |
| Average, <size> | Applies an average filter to the image to produce a blur (soften) effect. | Average, 5 |
| RemoveNoise, <size> | Applies a median filter to remove noise from the image. | RemoveNoise, 10 |
| GaussianBlur, <radius> | Performs a Gaussian blur on the image. | GaussianBlur, 5 |
The Copyfiles keyword takes a list of files to copy. All files are expected to be in the same folder as the preset, and the files are always copied to the output folder specified by the user. You can copy any number of files, but there must be only one CopyFiles statement in the profile. Although the statement must be present in the profile, its value may be empty. The CopyFiles statement has the following syntax:
CopyFiles=<File Name>{:New Name};<File Name>{:New Name};...
<File Name> is the name (and optionally path) of the file to copy. If you want to rename the file in the output folder, declare the new name immediately after <File Name>, separated with a :
In the preset file "\n" and "\t" are special notations for the carriage return character and the tab character, correspondingly. Do not use the backslash character (\) as path separator for file names. Use the forward slash character (/) instead to avoid inadvertent replacements of the two special characters.
CopyFiles=my_frame.htm:index.htm; logo.jpg; ../audio/acidloop.wav:bksound.wav
This statement copies the file "my_frame.htm" to the output folder and renames it to "index.htm". The file "logo.jpg" is just copied, and finally the file "acidloop.wav" is copies as "bksound.wav" to the output folder.
CopyFiles is used to copy background images, parts of your frameset and other files to the output folder. The sample scripts normally use a frameset for the gallery. The frame page of these frame sets is usually copied to the output folder using a CopyFiles statement. You can also use CopyFiles to copy bitmaps, music files, videos and all other sort of content to the output folder.
The most important feature of the Photo Gallery script are Key/Value pairs (KVP). Keys work much like variables in IMatch, with the difference that the value of these KVPs is contained in the preset. For example:
MyName=Mario M. Westphal
is a perfectly valid Key/Value pair. The key is "MyName" and the value is "Mario M. Westphal". Or consider this example:
PageBkColor=#FFFFFF
PageTextColor=#0000FF
Here we have two Key/Value pairs. They declare a page background color and a text color.
Note: if you use semicolons in the ProcessFile statement you need to duplicate the semicolon to avoid problems with the parser. For example, a must be written as ;
You use KVP in your HTML templates to control the layout, colors, the placement of active content and other formatting options. To access a KVP in one of your documents, use this syntax:
<#<Key Name>#>
where <Key Name> is the name of the key. For example:
<p>My Name is: <#MyName#>.</p>
If the Photo Gallery script finds this statement in your HTML file during processing, it will replace the expression with the corresponding value from the preset. In this case, the above statement will resolve to
<p>My Name is: Mario M. Westphal.</p>
Or consider the following HTML document:
<html>
<head>
<title>My HTML Template</title>
</head>
<body bgcolor="#FFFFFF" text="#0000FF">
</body>
</html>
This HTML page uses bgcolor and text attribute with the <body> tag to define the background color (white) and text color (blue) of the page. If this HTML document is used as a template with the Photo Gallery script, and your preset contains the key/value pairs mentioned above, you can change this document to:
<html>
<head>
<title>My HTML Template</title>
</head>
<body bgcolor="<#PageBkColor#>" text="<#PageTextColor#>">
</body>
</html>
When this HTML document is processed, the script will replace the KVP with their corresponding value from the preset:
<html>
<head>
<title>My HTML Template</title>
</head>
<body bgcolor="#FFFFFF" text="#0000FF">
</body>
</html>
If you define the colors this way in your preset, you can change the colors in your entire Photo Gallery by changing a single value in your preset. If you are familiar with Cascading Style Sheets: This works very similar, but does not require a CSS compatible browser. And there is much more...
You can use KVP anywhere in your HTML documents, and you can even nest KVP in your preset and your HTML documents. For example:
Font=Arial,Helvetica
SmallFontBegin=<font face="<#Font#>" size="2"
color="blue">
BigFontBegin=<font face="<#Font#>" size="4"
color="black">
This will resolve to <font face="Arial,Helvetica" size="2" color="blue"> or <font face="Arial,Helvetica" size="4" color="black"> in the HTML document. You can use this construct to make the font used in your documents configurable via your preset.
You can also use Application-level variables and image variables in your HTML templates. The script will recognize IMatch variables and resolve them to their current content:
<p>Copyright © {Application.Year} Mario M. Westphal</p>
This HTML statement will resolve to
<p>Copyright © 2002 Mario M. Westphal</p>
when it is processed by the Photo Gallery Script.
If you have user-defined variables, you can also use them in your HTML templates. This example assumes that there is a user variable MY_NAME which contains the value "photools.com":
<p>Copyright © {Application.Year} {User.MY_NAME}</p>
Running this statement through the script will give you:
<p>Copyright © 2002 photools.com</p>
You can of course also define a key/value pair in your preset to do the same:
MyCopyright=Copyright © 2002 photools.com
and use this in your HTML templates. For example, the following statement creates a table with one row, and one column containing your copyright information:
<table><tr><font face="Arial,Helvetica" size="2"><td><#My Copyright#></font></td></tr></table>
Image variables like {Image.Size} or {Image.IPTC.Headline} or {Image.EXIF.Date and time} can only be used within a template that is assigned to a generator. See the next section for more information about generators and templates.
The script uses a mechanism called "context" to control the processing of HTML templates and variables. Depending on the generators used, the context may always be the same for all pages, or it may change. For example, if you use the generators that work with categories, a new context will be created for each category. This allows the script to generate a set of pages per category.
The script supports a set of special variables which can be used to create dynamic content.
| <#CurImage#> | The file name of the current image. This is the file name for the image in the output folder |
| <#CurLink#> | The current link. This variable is used for some generators to indicate the current link based on the linkto: argument |
| <#CurImageNo#> | The number of the image in the current context |
| <#TotalImageNo#> | The total number of images in the current context |
| <#CurCatID#> | Id of current category context. |
| <#CurFileSize&list[&format]#> | The size of the file created for the current
image using the specified image
list and an optional
format
pattern for numbers. The format syntax is defined here and elsewhere. By default, the size is in bytes and contains locale-dependent thousand separators. If format ends with _KB or _MB then the size of the file is divided by 1024 and 1024*1024 correspondingly, before the remainder of the format pattern is applied. Example 1: <#CurFileSize&thumbs#> is the file size of the image thumbs341.jpg which is generated for the image list named thumbs. The result is a number string like 2,718. Example 2: <#CurFileSize&images/content&0.0_KB#> is the file size of the image content123.jpg which is generated for the image list named content and written to the folder images. The format pattern is 0.0_KB which calculates the file size in kilobytes rounded to one decimal. The result is a number string like 61.6. |
| <#CurFileWidth&list[&format]#> | The width of the current created
image using the specified image
list and an optional
format
pattern for numbers. The format syntax is defined here and elsewhere. The width is in pixels, and by default will have no formatting. Example 1: <#CurFileWidth&thumbs#> is the width of the image thumbs341.jpg which is generated for the image list named thumbs. The result is a number string like 1200. Example 2: <#CurFileWidth&images/content&##,##0#> is the width of the image content123.jpg which is generated for the image list named content and written to the folder images. The format pattern is ##,##0. The result is a number string like 1,200. |
| <#CurFileHeight&list[&format]#> | The height of the current created
image using the specified image
list and an optional
format
pattern for numbers. The format syntax is defined here and elsewhere. The height is in pixels, and by default will have no formatting. Example 1: <#CurFileHeight&thumbs#> is the height of the image thumbs341.jpg which is generated for the image list named thumbs. The result is a number string like 1200. Example 2: <#CurFileHeight&images/content&##,##0#> is the height of the image content123.jpg which is generated for the image list named content and written to the folder images. The format pattern is ##,##0. The result is a number string like 1,200. |
| <#TotalPageNo#> | The total number of pages in the current context. This variable is used for page control pages to control the first/last/next/previous variables |
| <#FirstPage#> | The file name of the first page in the current context. Used for page control pages. |
| <#LastPage#> | The file name of the last page in the current context. Used for page control pages. |
| <#PrevPage#> | The file name of the previous page in the current context. Used for page control pages. |
| <#NextPage#> | The file name of the next page in the current context. Used for page control pages. |
| <#NextImage#> | Only for the generators
Image Page and Grid Page: the file name of the
image on the next page in the current context. This variable can be used in
Javascript to preload the next image for faster transitions.
Note: in the case of grid pages, it will only give the filename of the first thumbnail on that page, and Javascript will also be needed in order to locate the name of the actual first image on the first image page. |
Special functions allow further manipulation of the generated HTML contents. These special functions generally are written like this: <@string@function@parameter 1@...@>. The string is manipulated by the function according to the given parameters and the result is inserted into the generated HTML in place for the special function expression. KVPs and IMatch variables are substituted before the evaluation of special functions occurs and may be used for any part of a special function. It is also possible to nest special functions, in which case functions are evaluated from the inside out.
Capitalization of the function name is not important. To insert an "@" character inside of the special function expression, it needs to be preceded by a backslash character "\".
| IfEmpty | Conditionally substitutes strings that only consist of white space characters. |
| IfNotEmpty | Conditionally substitutes strings that do not only consist of white space characters. |
| IfEqual | Conditionally substitutes a string based on testing if the string is the same as another string. |
| IfNotEqual | Conditionally substitutes a string based on testing if the string is different from another string. |
| Format | Formats text, dates, or numbers according to a format pattern. |
| Escape | Substitutes certain characters with a replacement string. |
| Trim | Removes white space characters surrounding a string. |
White space characters are space (character code 32), tabs (character code 9), carriage return (character code 13), and linefeed (character code 10).
Syntax: <@string@IfEmpty@trueExpr[@falseExpr]@>
If string contains only white space characters, then the result is trueExpr otherwise falseExpr. If falseExpr is omitted and string contains other characters, then the result is string. Inside the text of trueExpr and falseExpr any caret characters "^" are replaced with string, unless preceded by a backslash character.
A copyright notice needs to be generated for each image. If present in the image, the IPTC copyright notice should be used, otherwise the value of the KVP DefaultCopyright should be used. The following expression accomplishes that:
<@{Image.IPTC.Copyright Notice}@IfEmpty@<#DefaultCopyright#>@>
If this kind of copyright notice is needed in several places in the preset file and HTML templates, the KVP CopyrightNotice can be defined in the preset file:
MyName={User.My Name}
DefaultCopyright=© {Application.Year} <#MyName#>
CopyrightNotice=<@{Image.IPTC.Copyright Notice}@IfEmpty@<#DefaultCopyright#>@>
Syntax: <@string@IfNotEmpty@trueExpr[@falseExpr]@>
If string contains characters other than white space characters, then the result is trueExpr otherwise falseExpr. If falseExpr is omitted and string contains only white space characters, then the result is an empty string. Inside the text of trueExpr and falseExpr any caret characters "^" are replaced with string, unless preceded by a backslash character.
The window title of preview windows for single images needs to show the image name and the author of the image, e.g. "Blue Hills.jpg by Jürgen Failenschmid". Some of the selected images do not specify author information and the second part of the title text needs to be omitted. The following expression in the HTML template accomplishes that:
<title>{Image.Name}<@{Image.IPTC.By-line}@ifNotEmpty@ by ^@></title>
Syntax: <@string@IfEqual@testExpr@trueExpr[@falseExpr]@>
If string contains the same characters as testExpr, then the result is trueExpr otherwise falseExpr. If falseExpr is omitted and string is different, then the result is an empty string. Inside the text of trueExpr and falseExpr any caret characters "^" are replaced with string, unless preceded by a backslash character.
The total number of selected images needs to be included in a generated page, and depending on how many images there are the generated text needs to read: No image selected, 1 image selected, 2 images selected, etc. Here is one way how this can be achieved:
<p><@<#TotalImageNo#>@ifEqual@0@No image@^ image<@<#TotalImageNo#>@ifEqual@1@@s@>@> selected.</p>
Two IfEqual functions are used and the second one appears inside the falseExpr of the first one. According to the rules for the nesting of functions, the second IfEqual expression is evaluated first.
The CatNavPage generator is used together with the GridPage generator. Generally the category name and the category description are used as headers in the generated grid pages. However, in the page for the root category, some special HTML needs to be written instead of the category description. <#CurCatID#> is 1 for the selected root category. The following HTML template segment accomplishes that:
Syntax: <@string@IfNotEqual@testExpr@trueExpr[@falseExpr]@>
If string contains different characters than testExpr, then the result is trueExpr otherwise falseExpr. If falseExpr is omitted and string and testExpr are the same, then the result is an empty string. Inside the text of trueExpr and falseExpr any caret characters "^" are replaced with string, unless preceded by a backslash character.
The total number of images per category needs to be appended to the name of each category processed by the CatNavPage generator like this: Trees (127). If the category has no images, then only the category name must be written. Appending the following KVP to the category name within the td: argument of the generator achieves the desired effect:
ImageCount=<@<#CatImageCount#>@ifNotEqual@0@ (^)@>
Syntax: <@string@Format@formatPattern[_KB|_MB][@firstdayofweek[@firstweekofyear]]@>
string is formatted using a pattern and optional parameters relevant for numbers and dates. The meaning of each character of formatPattern and the significance of firstdayofweek and firstweekofyear are described here and elsewhere. Named formats and constants are not allowed. Use the numeric equivalents instead. If string can be converted into a number and_KB or _MB is appended to formatPattern, then the number is divided by 1024 and 1024*1024 correspondingly, before the formatPattern is applied.
The size of each processed image in megabytes needs to be included in the generated pages. The following expression writes the image size converted to megabytes and rounded to three decimals:
<p>Original size: <@{Image.Size}@Format@0.000_MB@> MB</p>
The modification date of each processed image needs to be written to generated pages in long date format, including the day of week number, and the week of year number. Days of the week must be counted starting Monday. The number for the week in a year must be counted starting with the first full week. The expression to achieve this is:
<p><@{Image.ShortDate}@Format@dddddd \do\w=w \week=ww@2@3@></p>
Note the use of backslash characters to tell the formatter that literal characters need to be inserted instead of interpreting those characters for formatting purposes. Sample result: Sunday, August 24, 2003 dow=7 week=33.
Syntax: <@string@Escape(@charcode[:replacement])*@>
| Character | Replacement |
|---|---|
| & | & |
| < | < |
| > | > |
| " | " |
| Tab | 	 |
| @ | @ |
| Linefeed | (empty string) |
| Carriage return | <br> |
Certain characters found in string are replaced by a given replacement string. This function facilitates compliance with HTML syntax for dynamic text, and can be used for other purposes as well. The optional charcode:replacement argument can be repeated as many times as needed. charcode is a numeric Unicode two-byte value. The default replacements are listed in the table.
Any charcode argument is merged with the default replacements. A charcode without a corresponding replacement string causes the removal of those characters. This is the default fate of all linefeed characters.
Note: if you use semicolons in the ProcessFile statement you need to duplicate the semicolon to avoid problems with the parser. For example, a must be written as ;
The image description needs to be used as the tooltip text for each processed image. Some images may have descriptions that include characters such as double-quote ("), that wreak havoc in HTML elements if not used properly. This can be solved:
<img alt="<@{Image.Properties.Description}@Escape@>" src="<#CurImage#>">
You want to add the image dimensions and number of bits per pixel for each processed image. The description of these image attributes needs to look like 640 x 480 x 24. You don't want the browser to break the description into several lines. The following expression can be added to the ProcessFile statement:
<@{Image.Width} x {Image.Height} x {Image.BPP}@Escape@32: ;@>
Note the use of two semicolons in ;.
Syntax: <@string@Trim@>
Leading or trailing white space characters are removed from the string.
Coming back to this example, some of the selected images may also contain unwanted leading or trailing spaces in the description. This expression first removes any unwanted spaces and then deals with problematic characters:
<img alt="<@<@{Image.Properties.Description}@Trim@>@Escape@>" src="<#CurImage#>">
The ProcessFile statement controls the generation of your HTML documents. You may add any number of ProcessFile statements to a preset. The general syntax of the ProcessFile statement is:
ProcessFile=name:<HTML Template>; type:<Generator>{;<Optional Arguments>}
Depending on the type value, different generators are executed to create your HTML documents. All generators take a template HTML document (specified by name) and replicate this document based on the other settings in the presets, and the arguments supplied via the ProcessFile statement.
Currently there are eight generators supported. Each of these generators produces a different type of output, from thumbnail pages (contact sheets) to category navigation pages or IPTC-keyword based indices.
Note: Only the first ProcessFile statement of type CatNavPage, CatTree, IPTCIndex is considered in a preset.
The <HTML Template> may be written like this: folder/template. This causes the generated HTML files for this ProcessFile statement to be written to a subfolder of the gallery target folder. For all generators, except CatNavPage, CatTree and IPTCIndex, the name of the folder is suffixed with a context identifier. All category navigation and IPTC keyword HTML pages are written to the same folder.
Example:
ProcessFile=name:contents/page.htm;
type:gridpage; ...
HTML files generated by the GridPage generator are
written to the subfolders named
contents1,
contents2,
contents3,
etc.
Always refer to the <HTML Template> using its full name. Only one level of subfolders is possible. The folder name must not contain dot characters.
If you use subfolders then you must consider the folder hierarchy for any reference in the HTML template to other files such as JavaScript libraries, CSS files, background images. This also applies to any href= element that is used in the HTML template. Generally it is sufficient to prefix the name of the referenced file by "../". Don't forget to add the subfolder names to any static file reference in the main HTML file (index.htm.)
You can use KVPs and IMatch variables in the value of <HTML Template>. Example:
MainPage=main.html
ProcessFile=name:<#MainPage#>; type:ParsePage
| ImagePage | This generator creates one HTML page per image in the selection. This generator is used to create slide show pages or detail pages in combination with other generators. The size of the images is controlled by the assigned image list |
| GridPage | Creates a grid page or contact sheet. You can specify the number of rows and columns. The size of the images on the page is controlled by the assigned image list. |
| PageControl | This generator is used to create <First><Last><Previous><Next> pages for navigating page sets with multiple pages. You can use this generator to add a frame that allows the user to navigate contact sheets or image pages in a slide show. Page control pages are linked with another page in your preset, so you need at least two ProcessFile statements. |
| NavigationPage | This generator creates a vertical or horizontal thumbnail list. The size of the thumbnails is controlled by the assigned image list. This type of navigation is useful if you have only a small number of thumbnails in your selection, or if you want to do something fancy... |
| CatNavPage | This generator creates a hierarchical set of pages based on the currently selected category or the currently selected images. It automatically includes all indirectly selected subcategories and allows the user to navigate your web site. This generator is linked to another page in your preset (grid page, image page) and hence you need at least two ProcessFile statements. |
| CatTree | This generator creates one page containing an expandable/collapsible "tree" representing the hierarchical structure of categories based on the currently selected category or the currently selected images. This generator is functionally equivalent to the CatNavPage generator, except for the different representation of the category structure. |
| IPTCIndex | This generator extracts all keywords from the IPTC data in the images in your selection (on-line images only!). It then creates an alphabetical index of all the keywords, with a navigation control. For each keyword, the generator emits 1 to n pages using a linked generator page. You need at least two ProcessFile statements in your preset. |
| ParsePage | Generic parsing and replacement generator. This generator does not process image lists, it only replaces keywords in the HTML template. This generator is great to process normal HTML pages, for example, to add index pages or text documents to your web gallery. |
Note: If you use semicolons in one of your key/value pairs, you need to duplicate it to avoid problems with the parser. For example, a must be written as ;
This generator emits one HTML page per image in your selection. Using an image list you can control the size of the bitmap. A HTML template document controls the layout and look of the resulting pages. With the template parameter you can control the dynamic content.
ProcessFile=name:<Name of HTML template>; type:imagepage; imagelist:<Name of image list>; template:<Template Code>[; linkto:<Page to control>]
ImageList=image:400
;These two key/value pairs allow us to control the text color and background
color
FontColor=#FFFFFF
BackColor=#000000
ProcessFile=name:imgpage.htm; type:imagepage;
imagelist:image; template:<img src="<#CurImage#>"
width="<#CurFileWidth&image#>" height="<#CurFileHeight&image#>">
The width and height arguments are optional but recommended to ensure proper page display, in case the image doesn't load. See description of CurFileWidth and CurFileHeight.
The special variables <#PrevImageNo#> and <#NextImageNo#> are replaced in the HTML template and in <Template Code> with the previous and next page number value correspondingly. The number value wraps around at the boundaries of the page number range, i.e., the value of <#PrevImageNo#> on the first page is the last page number and the value of <#NextImageNo#> on the last page is 1.
<a href="cat_popup<#CurCatID#>-<#PrevImageNo#>.htm">Previous</a> places a link to the previous image/page of cat_popup.htm.
If the
linkto: parameter is present then the special
variables <#FirstPage#>,
<#PrevPage#>,
<#NextPage#>,
<#LastPage#>
are replaced in the HTML template using the content of
<Page to Control>.
The first "."
character in <Page to Control>
is replaced with "<current category
id>-<page number>."
<#PrevPage#> and
<#NextPage#>
do not wrap around at the boundaries of the page number range. This is similar
to the function of the PageControl generator, but
does not require a separate frame. These special variables are not replaced in
<Template Code>.
<a href="<#PrevPage#>">Previous</a> places a link to the previous page in the HTML template file content.htm by specifying this parameter in the ImagePage ProcessFile statement: linkto: content.htm.
Before I explain the syntax of the remaining generators, we use the imagepage generator to explain how the script generates HTML pages and image lists.
To make the magic work, you also need an HTML document which will be used as the template for the page generator. Here is an example that can be used together with the above ProcessFile statement:
<!-- imgpage.htm -->
<html>
<body bgcolor="<#BackColor#>" text="<#FontColor#>">
<table cellpadding="2" align="center" width="100%">
<tr><td><#IMWG_Template#></td></tr>
</table>
</body>
</html>
The most important section here is the <#IMWG_Template#>. This special string will be replaced by the generator when it generates HTML pages from the template. For each image in the image list associated with the generator, the generator creates a HTML page from the template HTML document. The placeholder <#IMWG_Template#> is replaced with the template expression given in the ProcessFile statement for the generator, and all variables are replaced. Then the resulting HTML document is written to the output folder.
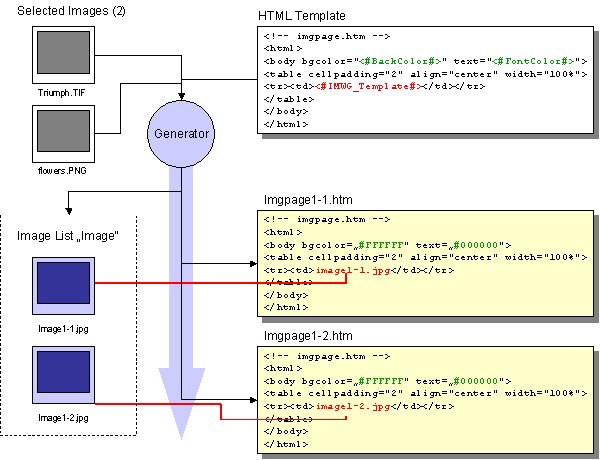
Since we used <img src="<#CurImage#>"> in our template, the generator replaces <#IMWG_Template#> with the name of the current image in the image list combined with the unique image ID. For the first HTML document this will be image231.jpg, and for the second HTML document image456.jpg.
The resulting HTML documents for an selection with two images look like this:
<!-- imgpage1-1.htm -->
<html>
<body bgcolor="#FFFFFF" text="#000000">
<table cellpadding="2" align="center" width="100%">
<tr><td><img src="image231.jpg"></td></tr>
</table>
</body>
</html>
<!-- imgpage1-2.htm -->
<html>
<body bgcolor="#FFFFFF" text="#000000">
<table cellpadding="2" align="center" width="100%">
<tr><td>image456.jpg</td></tr>
</table>
</body>
</html>
IMatch will create two images in the image list: image231.jpg and image456.jpg. Then the generator creates one HTML page per image in your selection. When the HTML documents are created, the <#Keys#> in the HTML template are replaced with their corresponding values in your preset. Then the <#IMWG_Template#> placeholder is replaced with the contents of the template: argument of the generator.
This generator creates pages containing one or more images organized in rows and columns. This generator can be used to create contact sheets, image bands, or complex layouts using IPTC, EXIF and other meta data.
The generator emits a table containing rows x columns cells. The <table> tag, the <tr> and <td> tags are fully customizable, allowing you to completely control the table and cell layout.
ProcessFile=name:<Name of HTML template>; type:gridpage; rows:<Number of Rows>; cols:<Number of columns>; imagelist:<Name of image list>[; table:<Template Code>][; <tr>:<TR code>] [; td:<TD Code>] [;tdempty:<Code for empty <td> tags>][; linkto:<Page to control>]
The number of rows and columns is given using the rows and cols parameters. The generator automatically generates empty cells if your selection contains less images than needed to fill an entire page. The table that is used to hold the images is created using the <table>, <tr> and <td> tags supplied in the ProcessFile statement.
ProcessFile=name:content.htm; type:gridpage; rows: 3; cols: 6; imagelist:thumbs; table: <table cellspacing = "8" cellpadding="2"; tr:<tr>; td:<td align="center" valign="bottom"><img hspace="4" vspace="4" border="0" src="<#CurImage#>"> <br> {Image.NameNoExt} <br> {Image.Width} x {Image.Height}</td>; tdempty:<td> </td>
You can combine this generator with a pagecontrol, navigationpage, catnavpage or IPTCIndex generator to create a complete slide show.
Again, the <#IMWG_Template#> tag must be embedded somewhere in the HTML Template page. The generator will replace this tag with the dynamic content emitted by the generator.
The generator creates as many pages as needed, where each page contains rows x columns images.
Note: You can use an asterisk * to indicate an "as needed" value for
either rows or cols.
For example, by specifying rows=* and cols=3, IMatch will create three columns
per page, but as many rows as needed to fit all images to a single page.
To add page navigation links to the same page as the grid, use the linkto: argument as described here.
This generator is always used with a gridpage or imagepage generator. It creates a navigation control that allows the user to move to the first/last and next/previous image in a series.
ProcessFile=name:<Name of HTML Template>; type:pagecontrol; linkto:<Page to control>
The <Name of the HTML Template> specifies the name of the HTML template to use for the generator. This page must contain variables like <#FirstPage#> or <#NextPage#> (see Special Variables above). The <#IMWG_Template#> controls where the generator inserts dynamic content.
ProcessFile=name:nav.htm; type:pagecontrol; linkto:content.htm
<body>
<table border="0" cellpadding="2" width="100%">
<td align="center"><#CurPageNo#> of
<#TotalPageNo#></td>
<td><div align="right">
<table border="0" cellpadding="2" bordercolor="#FF00FF" cellspacing="0">
<tr>
<td> </td>
<td> </td>
<td><font face="Verdana, Geneva, Arial, Helvetica, sans-serif" size="2"><b><a
href="<#FirstPage#>">First</a></b></font></td>
<td><font face="Verdana, Geneva, Arial, Helvetica, sans-serif" size="2"><b>| <a
href="<#LastPage#>">Last</a></b></font></td>
<td><font face="Verdana, Geneva, Arial, Helvetica, sans-serif" size="2"><b>| <a
href="<#PrevPage#>">Previous</a></b></font></td>
<td><font face="Verdana, Geneva, Arial, Helvetica, sans-serif" size="2"><b>| <a
href="<#NextPage#>">Next</a></b></font></td>
</tr>
</table>
</td>
</tr>
</table>
</body>
This generator type emits a page with thumbnails. Each thumbnail is linked to a content or 'detail' page. This is a simple way to generate a navigation page. You may also use this generator to create thumbnail navigations for other web sites.
ProcessFile=name:<Name of HTML template>; type:navigationpage; linkto:<Content page to link to>; imagelist:<Name of image list>; template:<Template HTML code>
The HTML template controls the layout and design of the page. The <#IMWG_Template#> tag controls where the generator inserts the dynamic content. With linkto you specify the name of the content page that is controlled by the navigation page. The imagelist argument allows you to specify which image list to use for the page. With the template code you define how the generator emits your pages. Use the <#CurImage#> variable to access the current image in the image list. The <#CurLink#> variable contains the name of the current content page (linkto page).
ProcessFile=name:nav.htm; type:navigationpage; linkto:content.htm; imagelist:thumbs; template:<tr><td align="center"><a href="<#CurLink#>"><img border="0" vspace="2" src="<#CurImage#>"></a><br><a href="<#CurLink#>">{Image.NameNoExt}</a><br><br></td></tr>
 |
This generator allows the creation of navigation pages based on your categories. This is a very sophisticated generator that enables you to use the category structure of your database for navigation of generated pages. Use this generator together with a grid page generator to create cool looking and fully functional web sites.
ProcessFile=name:<HTML template>; type:catnavpage; linkto:<Content page name> [; table:<Table tag>] [; tr:<TR tag>] [; td:<TD tag>] [; trback:<TR tag for back links>] [; tdback:<TD tag for back links>] [; trcur:<TR tag for the current link>] [; tdcur:<TD tag for the current link>] [;rootcategory:<category name>][; tdbranch:<TD tag for category with subcategories>] [; tdleaf:<TD tag for category without subcategories>] [; trtop:<TR tag for top links>] [; tdtop:<TD tag for top links>]
This generator must be combined with an image page generator or a grid page generator.
There are three different ways of specifying a selection for category navigation.
Note: The current active view is not always obvious in IMatch. For example, selecting a category in the category view, followed by Edit|Select All displays all images as selected in the thumbnail view, but the category view remains active. If the gallery script is started at that point, the generator runs in category selection mode instead of image selection mode. It is always best to activate the desired view by clicking on it before running the script.
 |
The <HTML template> is the name of the HTML
template document. This document must somewhere contain the
<#IMWG_Template#> special variable for the
generator to know where to insert the dynamic content: a HTML table with one row
for each processed category.
The linkto: argument defines which page the
generator controls. The generator links all category links to this page, and
automatically adjusts the URL to point to the correct page. The special variable
<#CatLinkTo#> is replaced in the HTML template
with the link to the controlled page for the current category.
The table and various tr and td arguments allow you to control the layout and design of the resulting HTML pages.
For the current category the following substitutions of special variables occur:
ProcessFile=name:nav.htm; type:catnavpage; linkto:gridpage.htm;table:<table width="99%" cellspacing="2" cellpadding="2">; tr:<tr>; td:<td valign="middle"><#IMWG_Template#></td>; trback:<tr>; tdback:<td class="CellBack"><img src="<#BitmapArrowL#>" align="absmiddle"> ;<a href="<#IMWG_CATBACK#>">Back</a></td>;trcur:<tr>; tdcur:<td class="CellCur"><a href="<#IMWG_CATCUR#>"><#CurCatName#></a></td>;
The special variable <#CatImageCount#> is replaced with the number of selected images for each category context. This replacement occurs within <Table tag>, <TR tag>, <TD tag>, <TR tag for the current link>, <TD tag for the current link>, <TD tag for category with subcategories>, <TD tag for category without subcategories>.
If the tdbranch: argument is present, it overrides the td: argument for finer control of the table cell layout for categories that have further subcategories. The following substitutions occur inside of <TD tag for category with subcategories>:
If the tdleaf: argument is present, it overrides the td: argument for finer control of the table cell layout for categories that do not have any further subcategories. The following substitutions occur inside of <TD tag for category without subcategories>:
Note: The special variable <#IMWG_Template#> is not used for tdbranch: and tdleaf: arguments.
In image selection mode the KVP ExcludeCategories lists fully qualified names of categories that are not included in the category navigation pages even if there are selected images that are assigned to the excluded categories, or any of their subcategories. The names in the list are separated using a semicolon (;). By default, no category is excluded. It is not possible to exclude the category "@All".
Example: ExcludeCategories=Screen shots; To do.Touch up
The exclusion of categories can result in selected images that could no longer be reached from the navigation pages, because all of the categories assigned to the images are now excluded. By default, these images are then reachable from the root entry ("All") of the navigation pages. The category for orphaned images can be specified with the KVP OrphanCategory. This category must exist in the database - however, the orphaned images are not actually assigned to the category in the IMatch database. It is possible to specify an excluded (sub-) category as category for orphaned images. If the OrphanCategory has assigned pictures then they are merged with the orphaned pictures.
Example: OrphanCategory=Leisure
Given the two sample KVPs above let's assume the following images were selected:
Since category Screen shots is part of the list of excluded categories, all of its subcategories are recursively excluded too. Therefore, image 1 only shows up in the navigation entry Toys. All categories of image 2 are excluded. It became an orphaned image and is therefore reachable from the navigation entry for category Leisure.
Included Categories And Orphaned Images
Essentially the reversed logic as ExcludeCategories applies if you choose to use IncludeCategories. All categories are excluded, unless they have been explicitly included. It is possible to include a category, but exclude a subcategory.
Example: IncludeCategories=Screen shots; To do.Touch up
ExcludeCategories=Screen shots.large
Now Ball.jpg will only appear in Screen shots.medium, since Toys was not included, and Playground.jpg will only appear in To do.Touch up, since Screen shots.large was excluded, even thought Screen shots was incuded. If none of an image's categories are included, or if they are all excluded, then the image will become an orphaned image.
This generator allows the creation of a navigation page based on your categories. One page is generated containing a hierarchical representation of the category structure in the database. Each category with subcategories forms a "tree branch" that can be expanded and collapsed dynamically. HTML unordered lists are used for the category tree. Except for the visual representation, this generator is functionally equivalent to the CatNavPage generator.
ProcessFile=name:<HTML template>; type:cattree; linkto:<Content page name> [; ul:<List tag>] [; ulbranch:<Sublist tag>] [; libranch:<List item tag for category with subcategories>] [; lileaf:<List item tag for category without subcategories>]
Refer to this section for a description of the three different selection modes. This generator must be combined with an image page generator or a grid page generator.
The <HTML
template> is the name of the HTML template
document. This document must somewhere contain the
<#IMWG_Template#>
special variable for the generator to know where to insert the dynamic content:
a HTML unordered list with one list entry for each processed category.
The linkto:
argument defines which page the generator controls. The generator links all
category links to this page, and automatically adjusts the URL to point to the
correct page. The special variable <#CatLinkTo#>
is replaced in the HTML template with the link to the controlled page for the
top category.
The various ul and li arguments allow you to control the layout and design of the resulting HTML lists.
The special variable <#CatImageCount#> is replaced with the number of selected images for each category context.
Read earlier sections regarding the replacement of special variables for the current category, the parent of the current category and the top category, as well as about exclusion of categories and orphaned images.
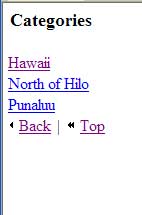
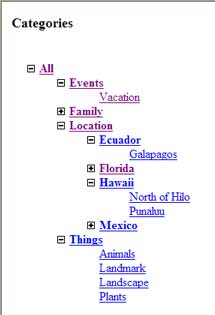
The category tree in this picture was generated using the following preset and HTML template files.
If you want the category tree to be displayed partially expanded when the page is loaded, use the Javascript function expand(depth) in the onload event of the page body. See example.
Sample preset:
; The description for the preset and the bitmap
Name=Sample category tree
Description=Uses tree for category navigation. Displays grid with 4 columns.
Preview=tree.bmp
; the name of the generated web's main page
MainPage=index.html
; images for expanding/collapsing category tree
; closed subcategory branch
BitmapClosed=listclosed.gif
; open subcategory branch
BitmapOpen=listopen.gif
; The header for the category navigation frame
CatNavHeader=Categories
; Caption under thumbnails
ImageTitle={Image.Properties.Description}
; To what depth should the tree be expanded initially? Top category has depth 0.
; if set to 0 then only the top category is visible initially
; if set to 1 then the top category and its immediate subcategories are visible
initially
; if set to 2 then two levels of subcategories are visible initially
; etc.
InitialExpansion=1
; The thumbnails for the grid page
ImageList=thumb:100
; The files to copy
CopyFiles= _
../jfgallery/listopen.gif:listopen.gif; _
../jfgallery/listclosed.gif:listclosed.gif; _
../jfgallery/foldingtree.js:foldingtree.js;
; Creates the main page
ProcessFile=name:<#MainPage#>; type:ParsePage
; Creates the thumbnail grid page
ProcessFile=name:cat_thumbs.html; type:gridpage; rows:*; cols:4; imagelist:thumb
; Default category tree navigation layout
ProcessFile=name:cat_tree.html;
type:CatTree; linkto:cat_thumbs.html
Sample HTML template:
<html>
<head>
<style type="text/css">
<!--
/* Don't change the class names - foldingtree.js depends on them */
/* Category with subcategories */
.foldheader
{
list-style-image: url('<#BitmapClosed#>');
cursor: pointer;
font-weight: bold;
}
.foldlist
{
}
/* Category without subcategories */
.foldleaf
{
list-style-type: none;
list-style-image: none;
font-weight:normal;
}
-->
</style>
<title>Category Tree</title>
<base target="_self">
<script language="JavaScript1.2">
<!--
// Preload images for collapsible list entries
// Don't change the variable names - foldingtree.js depends on them
var
closedImage=new
Image()
closedImage.src="<#BitmapClosed#>"
var
openImage=new
Image()
openImage.src="<#BitmapOpen#>"
//-->
</script>
<script language="JavaScript1.2" src="foldingtree.js">
</script>
<script type="text/javascript">
<!--
function loadnav()
{
var linkto = "<#CatLinkTo#>";
if (parent.content && (linkto != "")) {
parent.content.location.href = linkto;
}
// expand list to the given depth (root has depth 0)
expand(<#InitialExpansion#>)
}
//-->
</script>
</head>
<body onload="loadnav();">
<table>
<tr><td><h3><#CatNavHeader#></h3></td></tr>
</table>
<#IMWG_Template#>
</body>
</html>
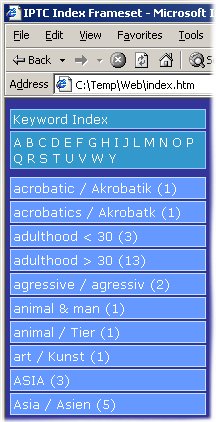 |
This generator extracts the IPTC keywords
from the images in your selection (on-line images only) and creates a
navigation structure from it. Combined with a grid page generator or a
image page generator this allows you to build a complete web site from
your images, using the IPTC keywords for navigation.
The generated page has a A-Z index at the top, and a dynamic list of keywords matching the selected character below that keyword index. The colors, fonts and layout can be configured using a cascading style sheet. The principal layout of the table can be controlled via the preset. You need to combine a second generator with this generator to create a web site. Normally, this will be the gridpage generator and a pagecontrol generator. Syntax:ProcessFile=name:<HTML template name>; type:iptcindex; linkto:<Link to content page> Example Preset:This preset uses three ProcessFile statements to generate a complete web site based on IPTC keywords. ProcessFile=name:kwindex.htm; type:iptcindex; linkto:thumbs.htm ProcessFile=name:thumbs.htm; type:gridpage; rows:4; cols:1; imagelist:thumbs; table: <table cellspacing = "2" cellpadding="2" align="left">; tr:<tr>; td:<td align="left" valign="top"><img hspace="4" vspace="4" border="0" src="<#CurImage#>"><td valign="top" class="GridFontSmall">{Image.IPTC.Object Name}<br><br>{Image.IPTC.Caption/Abstract}<br>{Image.IPTC.Headline}</td>; tdempty:<td> ;</td> ProcessFile=name:subnav.htm; type:pagecontrol;
linkto:thumbs.htm |
This is the simplest generator. It takes the given <HTML Template>, processes it, and then writes the file to the output folder.
ProcessFile=name:<HTML Template>; type:ParsePage
Since the script uses HTML templates and presets to generate your HTML pages, you are free to use any type of multimedia content in your pages. You can add flash animations, background sounds and other features as you like.
Revision 28